Tuesday, June 30, 2015
Converter Updates
We have been adding quite a few updates in the studio lately. The latest round of updates has been focused on updating our analog to digital and digital to analog conversion. Simply put this is the quality at which sound gets converted to 1's and 0's and 1's and 0's get converted back in to sound. It's not a place you want to compromise. The goal is to capture things accurately and in the most musical way possible.
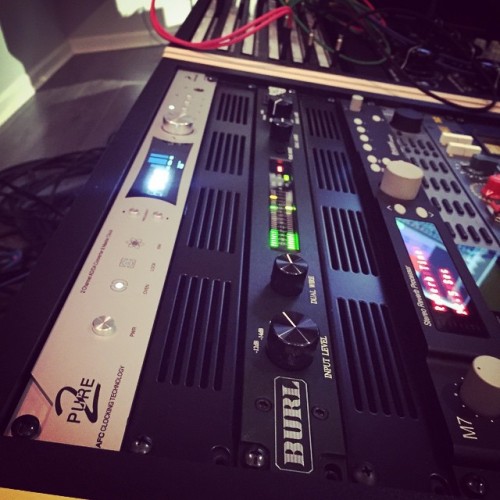
We have added Antelope Audio's new interface the Pure 2 as well as Burl Audio's B2 ADC.
This provides us advantages in a couple of ways. We now have options for the best quality sound coming back from analog equipment during the mixing process. Probably the place it makes the most impact is for mastering. Any serious studio that focuses on mastering needs multiple converters, due to the fact that material will sometimes sound better through different sets of converters. Doing an A/B of converters is one of the first steps in setting up the mastering chain for any studio using analog gear in the mastering process.
Details like this are what set our studio apart from other studios. We are the only studio in the area with multiple sets of mastering converters as well as a true analog mastering backbone. Contact us today to hear the difference.
http://freqzone.com
Saturday, December 13, 2014
EQ Shootouts Coming Soon
That's right, we are going to be doing some EQ shootouts in the studio pretty soon. Analog EQs have strengths and weaknesses. Understanding these is the first step to making the right decision on how to spend your hard earned money. One thing I've noticed is there isn't a lot of audio examples out there for various EQs. We will be running various devices from API, Rupert Neve Designs, Inward Connections, Trident Audio, and a few more through their paces. We will post various audio examples and thoughts. As we collect more EQs we will add more examples.
Thursday, December 11, 2014
The Freq Zone Gets More Dangerous
Dangerous Music that is. We already had a BAX EQ and it's a great piece of gear but with the addition of the new room what we really needed was an analog mastering backbone. It's something that's often overlooked, but when you are doing mastering work with analog equipment a backbone of some type is a necessity. It allows you to quickly compare settings, use volume matching, and perform complex processing tasks in the analog domain. A simple patchbay is just not enough for mastering tasks. This is because of the time it takes to patch something in/out and the perception of the material.
We went with a combination of the Dangerous Music Master and Dangerous Music Liaison. The flexibility between the two devices will allow us to perform pretty much any tasks we would like in the analog domain while treating analog hardware as plugins.
The Dangerous Master and Liaison are not just for mastering. By using the Master and Liaison combination off of the inserts on the console we can quickly audition gear and settings allowing us to make decisions quickly and more accurately then we would have otherwise.
We love Dangerous Music and these devices are great additions to the studio and offer us the flexibility we need in order to deliver the best result possible. Extremely high quality sound in a great package, what's not to love?
Contact us today and find out how these great pieces of gear can make your music sound even better and take your music to the next level.
http://freqzone.com
thefreqzone{at}gmail{dot}com
The Dangerous Master and Liaison are not just for mastering. By using the Master and Liaison combination off of the inserts on the console we can quickly audition gear and settings allowing us to make decisions quickly and more accurately then we would have otherwise.
We love Dangerous Music and these devices are great additions to the studio and offer us the flexibility we need in order to deliver the best result possible. Extremely high quality sound in a great package, what's not to love?
Contact us today and find out how these great pieces of gear can make your music sound even better and take your music to the next level.
http://freqzone.com
thefreqzone{at}gmail{dot}com
Monday, October 1, 2012
Stereo Tape Simulator Build
I recently decided to augment my analog chain by adding a stereo tape simulator to the mix. Those who know me know I am a huge fan of Rupert Neve Designs. After all I have a RND Master Buss Processor and I absolutely love it. RND makes a Portico 5042 tape simulator that actually uses a magnetic tape head. The thought of adding something with a magnetic tape head in to my chain wasn't an attractive option to me. Mainly because of the potential noise it would add in use with some of my other analog equipment. A quick Google search reveals that others have had the same issue with the RND tape simulator. Also there are only two simulated tape speeds with the RND device, which I find slightly limiting.
I could have also went with an Empirical Labs EL7 Fatso. The Fatso is a pretty neat device but I was actually looking for something a little different. I wanted to build something this time around. After all I can't have my soldering skills going in the toilet.
Enter the Sound Skulptor STS
Then I found the Sound Skulptor STS.
The STS was relatively inexpensive compared to some of the other devices, that is if you decided to build it yourself. Now, I have a little bit of an electronics background but I am far from being an expert. All in all I considered this build fairly straightforward build. If I had to rank the build difficulty on a scale of 1 to 10 I'd probably rank it at a 3 or 4.
All of the components and instructions were included in the kit.
You are also going to need a basic understanding of electronic components. You need to know what they look like as well as a general idea of their function. Even though it's not an overly difficult build if you don't know the difference between a capacitor and a resistor then you should probably not attempt it. For example if you put an electrolytic capacitor in backwards it will explode. A multimeter is also necessary so you are going to need to understand the basic functions of the multimeter as well as how to take measurements with it.
Most important is you are going to need to know how to follow directions. The build instructions are very logical having you install the shortest components closest to the surface of the PCB first. The build documents contain directions, schematics, and a layout sheet for the main PCB as well as the LED PCBs.
I can't stress the importance of having a decent soldering iron enough, especially one with a decent chisel tip. There are several ICs that you have to solder directly to the board without a socket. ICs are sensitive to heat so not getting them too hot is extremely important. I kept my soldering iron at about 350 degrees throughout the whole build which seemed to be the best for all components needed for the build. I recently purchased a Hakko Solder Station FX-888 and I absolutely love it. It comes with a small chisel tip that is great for electronic work.
The PCBs are all clearly marked, which made it easy to identify where the components go.
There are a total of 3 boards. There is the main PCB as well as the LED boards. You have to actually trim the LEDs and surface solder them to the board. They can be a little tricky at times because they can actually slide around on you while you are surface soldering them and they need to line up with the slot on the faceplate.
I shouldn't have to say this but since there are ICs involved you should ensure that static is fully discharged from your body before handling them.
Now the unit is fully assembled and ready for testing. Several measurements are necessary at this point before the unit is usable. Test audio files are available for download if you do not have a signal generator.
I got the 19" rack faceplate because I wanted to mount it in my rack.
At the testing phase you need to take certain measurements to ensure you are getting proper voltages at certain points as well as calibrating the LED boards for each side.
The only issue I ran in to during the build was that I was moving a bit faster than I should have and I got complacent with just one electrolytic capacitor. I put it in backward and needless to say it blew up before I had the chance to cut off the power. I got a replacement and all was well.
If you don't work on electronics all of the time you should probably expect to spend a couple of days doing the build and whatever you do don't rush. It may take about 6 to 8 hours to assemble, test, and make ready for use.
I use this unit quite often. When I put an analog chain together I usually use this as the first device and drive it in to some of my other analog equipment. Most notably it really excels on a drum buss. I really like the 15 IPS setting with the input at about 50 percent.
Drums are just the tip of the iceberg though. It sounds great on guitars as well as the entire mix buss. Obviously with a much more subtle setting on the mix buss. Even though it's subtle you can really tell it's doing it's job. There is just something about sending the your signal through a tape circuit that really gives you a nice sonic character that many people seem to really like.
I've used this device in the production of both rock and electronic music and it has worked very well for both types of music.
I have a couple of other projects on the table at the moment. I have a TLA C1 Dual Valve preamp/compressor that needs to be recapped. I am going to recap the unit as well as replace the tubes with some vintage Telefunken NOS tubes.
Also, I am going to build a 51x rack with some API preamp modules. Since I am thinking about building a new studio it would be nice to have a rack of API preamps for recording drums and other instruments.
A few other pictures of the STS build.
The STS was relatively inexpensive compared to some of the other devices, that is if you decided to build it yourself. Now, I have a little bit of an electronics background but I am far from being an expert. All in all I considered this build fairly straightforward build. If I had to rank the build difficulty on a scale of 1 to 10 I'd probably rank it at a 3 or 4.
All of the components and instructions were included in the kit.
The Build
What do you really need to know about electronics? First and most obvious is you are going to need to know how to solder. Soldering both standard as well as surface mount components is necessary during this build.You are also going to need a basic understanding of electronic components. You need to know what they look like as well as a general idea of their function. Even though it's not an overly difficult build if you don't know the difference between a capacitor and a resistor then you should probably not attempt it. For example if you put an electrolytic capacitor in backwards it will explode. A multimeter is also necessary so you are going to need to understand the basic functions of the multimeter as well as how to take measurements with it.
Most important is you are going to need to know how to follow directions. The build instructions are very logical having you install the shortest components closest to the surface of the PCB first. The build documents contain directions, schematics, and a layout sheet for the main PCB as well as the LED PCBs.
I can't stress the importance of having a decent soldering iron enough, especially one with a decent chisel tip. There are several ICs that you have to solder directly to the board without a socket. ICs are sensitive to heat so not getting them too hot is extremely important. I kept my soldering iron at about 350 degrees throughout the whole build which seemed to be the best for all components needed for the build. I recently purchased a Hakko Solder Station FX-888 and I absolutely love it. It comes with a small chisel tip that is great for electronic work.
The PCBs are all clearly marked, which made it easy to identify where the components go.
There are a total of 3 boards. There is the main PCB as well as the LED boards. You have to actually trim the LEDs and surface solder them to the board. They can be a little tricky at times because they can actually slide around on you while you are surface soldering them and they need to line up with the slot on the faceplate.
I shouldn't have to say this but since there are ICs involved you should ensure that static is fully discharged from your body before handling them.
Now the unit is fully assembled and ready for testing. Several measurements are necessary at this point before the unit is usable. Test audio files are available for download if you do not have a signal generator.
I got the 19" rack faceplate because I wanted to mount it in my rack.
At the testing phase you need to take certain measurements to ensure you are getting proper voltages at certain points as well as calibrating the LED boards for each side.
The only issue I ran in to during the build was that I was moving a bit faster than I should have and I got complacent with just one electrolytic capacitor. I put it in backward and needless to say it blew up before I had the chance to cut off the power. I got a replacement and all was well.
If you don't work on electronics all of the time you should probably expect to spend a couple of days doing the build and whatever you do don't rush. It may take about 6 to 8 hours to assemble, test, and make ready for use.
In Use
I built this thing a while back so I have been able to spend quite a bit of time with it. There really aren't that many controls. You have an input which controls the amount of the effect as well as an output control. You have a selector switch which you can control the IPS setting from 7.5, 15, and 30. Finally you have the hardware bypass for both the left and right sides.I use this unit quite often. When I put an analog chain together I usually use this as the first device and drive it in to some of my other analog equipment. Most notably it really excels on a drum buss. I really like the 15 IPS setting with the input at about 50 percent.
Drums are just the tip of the iceberg though. It sounds great on guitars as well as the entire mix buss. Obviously with a much more subtle setting on the mix buss. Even though it's subtle you can really tell it's doing it's job. There is just something about sending the your signal through a tape circuit that really gives you a nice sonic character that many people seem to really like.
I've used this device in the production of both rock and electronic music and it has worked very well for both types of music.
Conclusion
To close, everyone that has heard the STS has been pretty impressed. I certainly have gotten my money out of it. Even beyond the way it sounds I think the side effects have been just as helpful. I have started to think about why I am not building more equipment myself. When you build equipment yourself you have much more control over it's modification such as choosing different opamps or transformers.I have a couple of other projects on the table at the moment. I have a TLA C1 Dual Valve preamp/compressor that needs to be recapped. I am going to recap the unit as well as replace the tubes with some vintage Telefunken NOS tubes.
Also, I am going to build a 51x rack with some API preamp modules. Since I am thinking about building a new studio it would be nice to have a rack of API preamps for recording drums and other instruments.
A few other pictures of the STS build.
Subscribe to:
Posts (Atom)
Stem Mastering for Enhanced Audio Quality
Stem mastering is a relatively recent development in the world of audio engineering. It’s a process that can have a pretty dramatic...
-
Why are Automatic Mastering Services Bad At Mastering? If you think about it with the exception of touch, what's more personal and...
-
Stem mastering is a relatively recent development in the world of audio engineering. It’s a process that can have a pretty dramatic...
-
This is our first episode of tips and tricks. It was a good test run for us to get used to the cameras and workflow. The folks at Dang...

